Use Multiple Price Level in Tally in Hindi

Multiple price level tally का  एक impotant feature है जिसकी सहायता से टैली में विभिन्न तरह के products की लिस्ट उनकी price के साथ बनाई जा सकती है। generally price level list उन organisations के द्वारा बनाई जाती है जो multiple products deal करती है. price list different type के customers जैसे wholesaler, retailer, customer आदि के लिए बनाई जा सकती है। price list मुख्यतः दो आधारों पर बनायी जाती है 1) buyers के classification तथा 2) sale करने के period . यदि sale bulk (थोक ) में की जा रही है तो price  list में Discount भी add कर

Price List को Activate करना तथा Price List बनना -
Steps 1  :
Go to gateway of tally >> F11: features (inventory features)

  1. set use multiple price level for invoicing to yes 
  2. use multiple price level ko yes करने पर Company Price level की Screen आएगी जिसमे Different Price levels सेट करने है जैसा की नीचे दिया गया है -
Wholesaler
Retailer 
Customer
    3. screen को accept कर वापस gateway of tally पर आ जाये। 

mnkgj.k%  tc dksbZ xzkgd dsoy 1 T.V. 16000#- izfr ux [kjhns vkSj tc og eky vf/kd ek=k esa (tSls% 15 T.V. 14000#- izfr ux) [kjhnsA bl izdkj tc xzkgd vf/kd ek=k esa eky [kjhnrk gS rc 2000#- izfr ux dk discount fn;k tkrk gSA
                                                    Price List
Pieces         
rate
5-10             
Rs.15000
10-15           
Rs.14000
15-20           
Rs.12000

How to activate:-
·         Press F11-> F2 then Multiple Price Level to “yes”
·         Set the open list of company price levels. bl list esa fuEu ensa fn[kk;h t;sxh%&
Ø  Retailer or,
Ø  Wholesaler or,            
Ø  Customer or consumer.


·         Then go to inventory info-> price list


Then “accept” and create Price list:-

Then “accept”.
·         Make an entry in sale voucher.

Where to see:

Display-> Day Book and open the entry.


Cost Centre and Cost Category in Tally

क्या आप जानते है Tally.ERP 9 की मदद से आप आसानी से अपने प्रत्येक संगठनात्मक इकाइयों (एक विभाग, एक कर्मचारी आदि) लिए लागत का अलग से आवंटन कर सकते है ?
यदि हम अपने व्यापर की प्रत्येक unit की cost  तथा प्रत्येक unit पर Profit या loss के सम्बन्ध में निर्णय लेना चाहते है या जानकारी प्राप्त करना चाहते है तो इसके लिए  Cost Centre and Cost Category option का उपयोग कर सकते है.
सरल शब्दों
Maintain Cost Centers:- bl vkWi’ku dks “yes”. djus ij ,d cMh jkf’k ds Amount dks vyx vyx cost head es define fd;k tk ldrk gS
TkSls Entry dh 20000@& LVs’kujh ds pqdk,
By Stationary A/c Dr.         20000
To Cash A/c Cr.                      20000
(Purchase stationary)
bl Entry es flQZ bruk irk pyk gS fd LVs’ujh ij 20000#++- pqdk, ysfdu ;g ugh fd LVs’kujh ds fdu&fdu enks ij 20000#++- [kpZ gq,
After cost centre entry
By Stationary A/c Dr.          20000
          Pen
            Notebooks
            Notepad
            Penholder
   To Cash A/c Cr.                  20000
(Purchase stationary)

एक अन्य उदाहरण के द्वारा इसे समझते है-
Tally.ERP 9 में cost centre option use करने के लिए किसी organization के  Sales  Department  का उदाहरण लेते जिसमे 4 अलग Salesman काम करते है।  इनके Income तथा expenses को Record करने के लिए निम्न स्टेप्स फॉलो करे।
Enabling Cost Centre and Cost Category
To do this:
 Go to Gateway of Tally > F11: Features > F1:Accounting Features
 Set ‘Maintain Cost Centres’ to ‘Yes’
 Set ‘More than ONE Payroll/ Cost Category’ to ‘Yes’

Creating Cost Categories:
salesman group को एक Cost Categories के under define करना होगा।  ऐसा करने के लिए निम्न स्टेप्स फॉलो करे।
 Go to Gateway of Tally > Accounts Info. > Cost Categories > Select ‘Create’ under ‘Single Cost Centre’
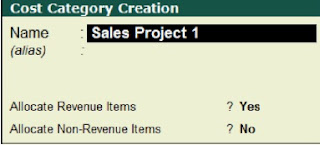
 Enter ‘Sales Project 1’ in ‘Name’ > Accept the screen


Creating Cost Centres
प्रत्येक Salesman को एक Cost Center माना जायेगा अर्थात किसी मद पर होने वाले खर्चे की लागत। इसे बनाने  के लिए निम्न स्टेप्स फॉलो करे।
 Go to Gateway of Tally> Accounts Info.> Cost Centres> Select ‘Create’ under Single Cost Centres
 Select ‘Sales Project 1’ in ‘Category’
 Enter ‘Salesman 1’ in Name and accept the screen
इसी प्रकार से अन्य 3 Salesman के Cost Center बनाने है।
Transaction करने के दौरान खर्चों का Cost Center में आवंटन करना -
salesmen’s सम्बन्धी खर्चे करते समय या उन्हें पेमेंट करते समय उनके खर्चो को Cost Center में allocate करने के लिए निम्न स्टेप्स फॉलो करे।(उदा. के लिए Conveyance):
 सबसे पहले इसके लिए बनते है Conveyance की ledger under ‘Indirect Expense’ ध्यान रखे की ‘Cost Centre is enabled by default.
payment transaction की entry करने की लिए :
 Go to Gateway of Tally > Accounting Vouchers > F5: Payment
 Debit the ‘Conveyance’ ledger with the required amount
 Press Enter to open ‘Cost Allocation’ screen
 Select the ‘Sales Project 1’ in ‘Cost Category’

 Allocate each Salesman with the amount as shown:
 Complete the Payment Voucher

Pre-Allocation of Costs:
Fast Entry करने के लिए आप pre-allocate cost centres का उसे ले सकते है इसमें percentage define की जाती है Cost Centre Class में।  उदा. के लिए यदि salary  Rs.50, 000 है और आपको उसे percentage में distribute करना है जैसे Salesman 1 को 30%, Salesman 2 को 25%, Salesman 3 को 25%, Salesman 4 को 20 %. ऐसा करने के लिए निम्न स्टेप्स फॉलो करे।
 Go to Gateway of Tally > F11: Accounting Features
 Set 'Use Pre-defined Cost Centre Allocations during Entry' to 'Yes' > Press ‘Enter’
On the ‘Auto-Cost Allocation’ screen,
 Enter the ‘Class Name’ and press ‘Enter’
 Select the appropriate ‘Cost Category’ and enter the required percentage


अब हमtransaction में ‘Cost Centre Class’ को use करते है Salesman को Salary Pay करने के लिए। ऐसा करने के लिए सबसे पहले Salary की ledger Create करें Under 'Indirect Expenses ' तथा सभी Cost Centes (Salesman) को allocate करें।  इस transaction को pass करने के लिए निम्न स्टेप्स फॉलोे करें:
 Go to Gateway of Tally > Accounting Vouchers > F5: Payment
 Select ‘Salary’ in ‘Cost Centre/Classes’
 Complete the Payment Voucher
To view the break-up of the cost centres allocation, open the same Payment Voucher in alteration mode as shown:

Cost Centre Reports
Tally.ERP 9 reports provide कराती है सभी Cost Center की complete details देखने के लिए तथा उनसे सम्बंधित transactions को देखने के लिए विभिन्न तरीको से।
1. Category Summary
2. Cost Centre Break-up
3. Ledger Break-up
4. Group Break-up
उदा. के तौर पर ‘Cost Category Summary’ की report नीचे दिखाई गई है।

इस Cost Center  report को देखने के लिए :
 Go to Gateway of Tally > Display > Statements of Accounts > Cost Centres


Multi-Currency in Tally in Hindi

क्या आप जानते है Tally.ERP 9 में multi-currency feature के द्वारा foreign trade business में आने वाली सभी  requirements जैसे विभिन्न तरह के  transactionsको पास करने से लेकर Forex Gain/Loss को एडजस्ट करने तक की सभी Problems को solve कर सकते है?  यह feature आपके लिए तब भी बहुत Important होता है जब आप एक से अधिक करेंसी में काम करते है।
globalization के आ जाने से, multi-currency को उपयोग में लेना उन सभी कम्पनीज के लिए जरुरी हो गया है जो International Trade business से जुडी है।  सभी तरह के transactions करने तथा उनकी रिपोर्ट्स को देखने में multi-currency फीचर  बहुत काम आता है। खासकर  Forex Gain/Loss को एडजस्ट करने में जो की एक Important एक्टिविटी है accurate Profit/Loss account statemenटी बनाने में।  इस प्रोसेस को करते हुए
 करेंसी की Rate के उतार चढ़ाव को रेगुलर मेंटेन करना चुनौती भरा कार्य है।  Tally.ERP 9 में विस्तृत multi-currency support Provide किया गया है जिससे हम Easily करेंसी की Rates तथा Forex Gain/Loss को manage कर सकते है।
Users इसमे unlimited currencies बना सकते है (US dollars, Singapore dollars etc.), इसमे चाहें तो  Currency को Lakhs या  Millions ,में शो करा सकते है। उदा. के लिए आपकी Indian Company की Balance Sheet को आपकी Company का partner Japan में Yen Language में देख सकता है।

To use Multi-Currency in Tally.ERP 9:
· Go to Gateway of Tally > F11: Accounting Features
· Set ‘Allow Multi-Currency’ to ‘ Yes’
· Accept the screen


Note: The base currency of the company is specified during the company creation

Creating Currencies:-
· Go to Gateway of Tally > Accounts Info.> Currencies > Create
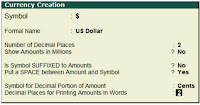
· Enter the required details as shown below:
· Setting ‘No’ to ‘Show Amounts in Millions’ will display the currency in Lakhs.
· Accept the screen

ऐसे ही टैली में other currencies भी बना सकते है keyboard shortcuts का उपयोग करके जो की नीचे दिए गए है -
· Euro ‘€’ (Alt + 0128),
· Japanese Yen ‘¥’ (Alt + 0165)
· Pound Sterling ‘£’ (Alt + 156)
Note: इसके currency symbols को Use में लेने के लिए आप ‘Character Map’ को Use  में ले सकते है जिसकी Location Windows PC में ‘Start > All Programs > Accessories > System Tools’ है।

Altering Currencies and Defining Rates of Exchange:-
currency को Alter करने के लिए -
· Go to Gateway of Tally > Accounts Info. > Currencies > Alter
यह आप different date के लिए Currency की  different rate of exchanges को Change कर सकते है।


Note:  1. Standard rate का मतलब किसी Currency की Market में वर्तमान Rate
           2. Selling rate जिस Rate पर Bank आपसे Currency खरीदता है।
           3. Buying Rate जिस Rate पर आप Bank से Currency खरीदते है।

Voucher Entry में Foreign Currency को Use करना -
multiple currencies में transactions करने के लिए एक service provider का उदा. लेते है - ‘ABC Company’ $5000 में ‘XYZ Company’ को Service Deliver करती है।  Currency की rate of exchange इस transaction में Rs.55/$. है।

To create a Sales Voucher for this transaction:
. Go to Gateway of Tally > Accounting Vouchers > F8: Sales (Select ‘As Invoice’)
· Select ‘XYZ Company’ in ‘Party’s A/c Name:’ and then ‘Service Charges’ under ‘Particulars’
and enter ‘$5000’ in ‘Amount’ > Accept the default selling rate on ‘Rate of Exchange’ screen.

Accounting Receipt for the Payment:
जब हमारे द्वारा की गयी Services का  Payment Receive होता है तो exchange rate Rs. 55.50/$ हो गयी  receipt voucher में Entry Pass करते है जैसा की नीचे दिखाया गया है।
· Go to Gateway of Tally > Accounting Vouchers > F6: Receipt
· Credit the ‘XYZ Company’ and debit the ‘Bank’ with ‘$5000’
· Enter the rate of exchange for both ledgers as ’55.50’
· Accept the Screen.

Budgets in Tally in Hindi

क्या आप जानते है Tally.ERP 9, में Budget Feature का Use करके आप अपनी कंपनी के आय तथा व्यय पर नजर रख सकते है की आपके बजट के According है या नही तथा यह कंपनी के Funds को और effectively Use करने में आपकी हेल्प करेगा ?

To enable Budgets in Tally.ERP 9:
 Go to Gateway of Tally > F11: Features (Accounting Features)
 Set ‘Maintain Budgets and Controls’ to ‘Yes’


Creating Budgets
individual ledger account, groups of ledger accounts तथा  Cost Centers इन सभी के लिए हम Budget बना सकते है।  उदा. के लिए traveling, advertisement, operations आदि के लिए बजट बना सकते है।  

To create Budgets:
 Go to Gateway of Tally > Accounts Info. > Budgets
 Select ‘Create’ > Press ‘Enter’
 Enter budget name in ‘Name’
 Select ‘Primary’ in ‘Under’
 Specify the ‘Period of Budget’ in ‘From:’ and ‘To:’

1) For Group Budgets:
अगर आप सभी खर्चो का पता लगाना चाहते है, तो आप Financial Budget बना सकते है जैसा की नीचे बताया गया है।  
 Set ‘Yes’ under ‘Group’ in ‘Set/ Alter Budgets of’ > Press ‘Enter’


 In ‘Group Budgets’ screen, select the required Group in ‘Account Name’
 Select the appropriate ‘Type of Budget’
 Enter budget ‘Amount’
 Accept the screen


Note :- ‘On Closing Balance’ Option एकाउंट्स के Closing Balance को Final Acounts में Budget  के साथ तुलना करने में Use किया जाता है।  तथा ‘On Nett Transactions’ Option एक निश्चित समय के लिए किये गए transaction के amount को monitor करने के लिए किया जाता है।  

2) For Ledger Budget:-
जैसे हमने Group Budget तैयार किया था वैसे ही  Ledger Budget तैयार करना है  Set /Alter Budget के Options में Group की जगह ledger को 'yes' करना है। 


3) For Cost Centre:-
जैसे हमने Group Budget तैयार किया था वैसे ही  Cost Centre Budget तैयार करना है  Set /Alter Budget के Options में Group की जगह Cost Centre को 'yes' करना है। 


Displaying Budgets and Variances for Groups and Ledgers
 Go to Gateway of Tally > Display > Trial Balance
 Press ‘Alt+B’ or click on ‘B: Budget Variance’


अब कीजिये बोल कर टाइप आसानी से


अगर आपको टाइपिंग नही आती और कोई matter आपको फटाफट से टाइप करे देना है तो यह आपके लिए मुसीबत हो सकती है ऐसे कई मौके होते है जहाँ हमे टाइप matter की जरुरत होते है और हम किसी ऐसे इंसान को ढूंढते है जो हमारे matter को टाइप कर दे। मान लीजिये आप अा बिस्तर पर लेटे हैं और मन में कुछ विचार आ रहे हैंजिन्हे आप का लिखने का मन नहीं है और न ही फोन, लैपटॉप या कंप्यूटर पर टाइप करने का। ऐसे में यदि आपके विचार खुद-ब-खुद टाइप होने लगें, तो कहना ही क्या ! हालांकि आपके मन को पढ़ने वाली कोई सुविधा अभी तक विकसित नहीं हो सकी है, लेकिन यह जरूर संभव है कि आप बोलते जाएं और आपके विचार अपने आप टाइप होकर सेव होते जाएं जी हां, गूगल ने गूगल डॉक्स पर यह सुविधा शुरू कर दी है और कमाल की बात यह है कि इससे न सिर्फ आप बोलकर टाइप कर सकते हैं, बल्कि वॉइस कर सकते हैं। आपको बस एक इंटरनेट कनेक्शन चाहिए और अपने डिवाइस में एक माइक्रोफोन। अधिकतर स्मार्टफोन है। खास बात है कि डेस्कटॉप पर इसे अलग से लगाना पड़ता है।

आवाज के साथ यू कीजिए टाइप क्रोम ब्राउजर में
गूगल डॉक्स ओपन कीजिए और उसे लॉग-इन कीजिए नया डॉक्यूमेंट ओपन कीजिए और Tools > Voice typing में जाइए। इसके सामने दिखेगा। जब आप बोलने के लिए तैयार हो जाये तो माइक्रोफोन पर क्लिक कीजिए। स्पष्ट और साफ आवाज में बोलिए और बोलने की गति को भी सामान्य रखिए। आपको आपका टेक्स्ट टाइप होता नजर आएगा। आप टेक्स्ट को एडिट कर सकते हैं और इसमें टेबल व दूसरी चीजें इंसर्ट भी कर सकते हैं। वॉइस कमांड्स की पूरी लिस्ट यहां से देखी जा सकती है.

Printing Company Logos On Reports And Invoices in Tally

क्या आप जानते है की आप अपनी कंपनी का लोगो सभी रिपोर्ट्स तथा इनवॉइस (बिल) पर प्रिंट करा सकते है जो टैली सिस्टम द्वारा जनरेट किये जाते है ?
एक कस्टमर के रूप में आप किसपे ज्यादा विश्वास करेंगे - एक विक्रेता जो आपको अपनी कंपनी के बिल पर  कंपनी का लोगो प्रिन्ट करके देगा या उस विक्रेता पर जो एक सादे कागज पर आपको बिल प्रिंट करके देगा ?
of course आपका जवाब होगा पहला option। अगर आपको लगता है की Bills  और Reports  पर कंपनी का लोगो प्रिंट करवाने में Additional charges लगेंगे तो आप Relax हो जाइये अगर अपने अपने कंप्यूटर में Tally.ERP 9  आप अपने कंपनी Logo को  एक plain Paper पर प्रिंट कर सकते है तथा यह version image Printing को भी support करता है। आपकी कंपनी का Logo  .bmp, .jpg or .jpeg image formats में  होना चाहिए। image printing feature की मदद से आप Company Logo के साथ exclusive reports तथा 
documents बना सकते है , जो की आपकी कंपनी की Value बढ़ायेगा तथा आपकी एक अलग पहचान बनाएगा हरofficial document  में। 

To configure the logo printing function:
• Go to ‘Gateway of Tally > F11: Features > Accounting Features’.
• Set the option ‘Enable Company Logo’ to ‘Yes’.
printing of the company logo को Enable करने के बाद Company Logo Path Screen में Logo की Location डालनी होगी। 
Invoice पर लोगो देखने के लिए :-
एक Sales Voucher Create करके ‘Alt + P’ Command Press करें। 

An Invoice with a logo ready for printing


Let us see another example of a Pay slip with a logo:


ऐसे ही हम निम्न Documents पर भी Logo Print करा सकते है -
• Sales invoice
• Delivery note/challan
• Debit note
• Credit note
• Outstanding receivables
• Reminder letters
• Pay slips
• Purchase orders
• Receipt vouchers
• Confirmation of accounts notes


Total Pageviews